Tutorial #120 - This: to this: using Gimp. Translatable.
Requested by Ithilwen.
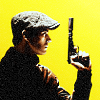
Open and prep image/base. I was making a POI icon again, and for this one I was using a wide shot of Reese as he oh-so-epically walks away from the wrecked car in the Pilot episode. *rubs hands together gleefully* I began by resizing the image, scaling it, and then removing the car and the CBS logo because I found them distracting and I wanted the focus to be on just him.
*nods* I approve of this. Onward!
Like my previous tutorial, I had this icon saved as a project, but unlike my previous tutorial I really have no idea what coloring I did on my first step. I'm not even sure what coloring tool I used, although it was likely Color Balance or Levels but I didn't find a matching preset saved in either one so I really don't know.
The good news is that this step is probably not essential to the final product of your icon, and I'm not even sure why I did it on mine because I had completely undone it by the time I was finished. *shrug* At any rate, I shall bypass this coloring step and show you what I did afterwards.
After my unknown first step, I boosted the coloring by going to Colors>Hue Saturation and raising the Master Saturation to +50.
I added this: set to Multiply at 100%.
I then duplicated the base layer, brought it to the top, set it on Screen at 100% and then flattened my image.
The Screen layer brightened the image up, and the blue texture beneath it kept the sky from being completely washed out.
I wanted to add some more blue tones, so I opened up Colors>Levels...
Value: 0, 1, 250. | 10, 255.
Red: 0, 1.10, 255. | 0, 255.
Green: 5, 1, 255. | 0, 255.
Blue: 20, 1.20, 220. | 10, 255.
I then lowered the opacity of that layer to 50% and flattened the image.
I opened Colors>Brightness-Contrast: -15, +10.
I then boosted the coloring again by using Hue-Saturation and setting the Master Saturation on +10.
I sharpened the image a bit (Filters>Enhance>Sharpen).
I'm not sure why, but I did some Channel Mixer here because apparently I thought it needed to be even more vibrant.
Red: 160, -60, 0.
Green: 0, 100, 0.
Blue: -60, 65, 100.
Preserve Luminosity: off.
I erased everything on that layer except the sky, because I liked what it did to the blue but the rest of it was too intense.
I then duplicated the base layer, brought it to the top, did that exact same Channel Mixer on it and then lowered the layer opacity to 25%.
I flattened my image and used the Blur/Sharpen tool to blur out any pixely spots that I didn't like in the sky. (Nit-picky icon maker, here!)
I added this: set to Soft Light at 65%. This darkened the top of the image.
I added this: set to Screen at 100%.
And I ended up with this:
That's all, folks.
PM me if you have any questions!
Please do not copy exactly.
----------------------------
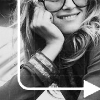
Tutorial #121 - This: to this: recreating this: using Gimp. Translatable.
Requested by Ithilwen.
Open and prep image/base. My base was pretty dark, so I started out by brightening it up with some Curves...
Value: x: 51, y: 106. | x: 117, y: 228.
Red: x: 111, y: 116.
Green: x: 117, y: 122.
Blue: x: 111, y: 114.
I added this: set to Soft Light at 100%.
I flattened my image.
I opened up Colors>Levels and used one of my favorite presets to add a bit more of a bluish-red tone.
Value: 0, 1, 250. | 10, 255.
Red: 0, 1.10, 255. | 0, 255.
Green: 5, 1, 255. | 0, 255.
Blue: 20, 1.20, 220. | 10, 255.
I added this: set to Soft Light at 100%, and then flattened my image.
I duplicated my base layer, went to Filters>Blur>Guassian Blur and blurred the duplicated layer with a blur radius of 5. I set the blurred layer on Soft Light at 25%.
I flattened my image and then sharpened it a bit as a final step.
That's all. It's not a perfect recreation, but it's pretty close.
(recreation)
(original)
PM me if you have any questions!
Please do not copy exactly.
--- flambeau
Fan Art Tutorials
Moderators: wild rose, SnowAngel
Re: Fan Art Tutorials
"It. Doesn't. Have. To. Match."
President of the Manalive Conspiracy
Founder of Team Hoodie
Icon by me
President of the Manalive Conspiracy
Founder of Team Hoodie
Icon by me
-
flambeau - A Concerned Third Party
- Posts: 1774
- Joined: Mar 25, 2008
- Location: Wandering the streets of Merit
Re: Fan Art Tutorials
Tutorial #1 "Thrive" Daisy avatar by AslansChild
(Using GIMP)
Requested by Ithilwen
How to turn this:
Into this: (or this)
Please note that I've only just recently learned (thanks to Ithilwen ) about the ability in GIMP to view your history on past works. I didn't know that when I made this specific avatar, I simply made it to my liking and saved it as a ".png". Due to that fact, I do NOT in fact have the history for this particular avatar and had to try to re-create it. Because of this, it's not identical, but I feel it's fairly close. Also, all textures where taken from NW forums, I'm not sure who made all of them, if you'd like that person (or yourself) recognized, feel free to PM me the information and I'll add it in. Danke.
Now...on to the tutorial!
_____________________________________________________________________
First, open and prep image: crop, scale, etc. (After I did this, I went to Colors>Levels and made the "Value" Input levels : 5,1.00,243 . I also went to Colors>Brightness-Contrast and made it 0 Brightness and 10 Contrast. & I went to Colors>Hue-Saturation and made it 0,0,30.
Next, I added these layers (listed from bottom to top)
< Set to Overlay 100%
<Overlay 20%
< Overlay 40%
< Overlay 100%
(Again, I know) and set it to Overlay 22%
< Overlay 100%
< Overlay 100%
< Overlay 76%
< Overlay 5%
< Overlay 5%
Then I take the "THRIVE" texture from this set (by flambeau):
And set the texture to Screen. Bring that layer to the top. I scaled it down a bit and put it right next to the daisy.Now, go to the base layer. With your Paintbrush Tool, and using the color "1d1313" paint "over" the "THRIVE" texture. I use the term "over" because since you're painting the bottom layer, it'll actually be under the "THRIVE" texture...I do this to simply fill in all the little white spots on the texture with color, to make the word stand out more.
THEN, I take this texture:
and set it to Lighten Only 100% This fills in all the dark areas of the avatar with the gray from the texture, rather than a heavy-er black. Flatten image and save.
And...you're done! As I said, it's not the original, but I feel it's pretty close. If you look at the lower left corner of the original, you can see it looks a wee bit darker on the edges. You can also see there's a more vibrant ray of colors on the upper right plank of wood above the "THRIVE".
Enjoy!
& Feel free to PM for any questions or requests.
AslansChild
"...when my heart is overwhwlemed, lead me to the Rock that is higher than I."
-Pslam 61:2
-Pslam 61:2
-
AslansChild - Posts: 496
- Joined: Jun 09, 2011
- Location: In a perfect place,in battle.
Who is online
Users browsing this forum: No registered users and 2 guests